
This quilt is inspired by the roundabout quilt-along by Amy over at A Commonplace Life. I love the first quilt she made and have wanted to make a similar circle quilt ever since I first saw the one she made. When I found out my sister-in-law was having another baby I eventually decided I would like to make her a circle quilt, and I was excited when we talked about it and she said she liked the roundabout quilt too. But when I went back to the tutorial I found that the blocks--the quarter-circle blocks--finished up at about 11 inches. I like to make baby quilts somewhere around 36x42 inches, and an 11-inch quarter circle block seemed way too big for the quilt I wanted to make. This time at least.
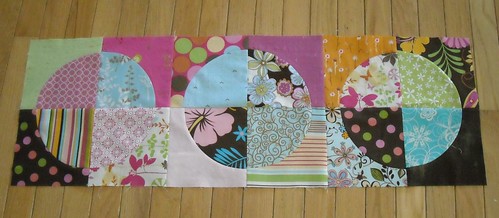
So I did some drawing and figuring, and decided I would go with 6-inch finished quarter circle blocks, 48 of them, for a baby-sized quilt that will end up about 36x48 inches.
So here's part one of designing your own circle quilt--first you need to decide the size of quilt you want. If you want to make a standard bed sized quilt, go ahead and do a google search of quilt sizes. Most of the quilts I make are baby quilt size (around 36x42" or slightly bigger) or throw size (I like to go with 50x70"). From there, think about what size of quilt blocks will fit within those finished quilt dimensions. If you want to have all the blocks made into groups of four that look like circles, you'll need to keep that in mind. There are other layouts you can use though--you can check out the roundabout quilt pattern flickr group for some ideas.
It might help to draw out your quilt to get a rough idea of how it could look. Don't worry about having perfect drawing skills, just get your idea down on paper. If I can find the original little sketch I made for this quilt, I'll take a picture of it to show you.
In the next few posts I'll write about calculating the fabric yardage you need, drawing and making your template, cutting your fabric, and piecing the quarter-circle units. I'd love to hear from you if you think you'll make one of these quilts--what size of circle quilt are you thinking of making?
5 comments:
I'm loving it! Everyone should know how picky and opinionated your sister-in-law is, too. Thanks for putting up with me and letting me be involved in the process. I'm so excited for my little girl to have such an amazing quilt. We're so lucky!
Oh, I love it! I'm excited to see how this unfolds because a circle quilt is on my 'bucket' list :D.
Love the fabrics you have picked and the circles are so neat!
Beautiful fabrics and thanks for the tips! You've totally reminded me and inspired me to pick up my roundabout quilt again! It's buried under several layers of other WIPs! gasp! Can't wait to see blocks all together!
Good tips. I love circles.
Post a Comment